Hello Friends!
I am linking up with Tara from 4th Grade Frolics for Monday Made It!
I had eye surgery last week so I took a few days off to heal but now I am back!
This post contains affiliate links. I earn a small commission each time someone makes a purchase using one of my links, which helps to support the blog. All opinions are my own.
See our full disclaimer here.

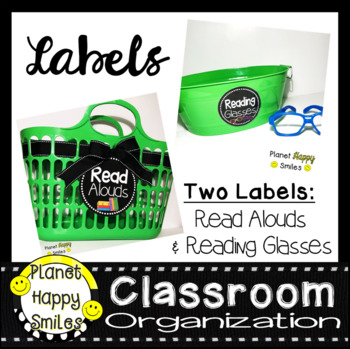
My first project on the list was making a couple of cute bins. My "Read Alouds" basket to hold some of the books we will read during the week & a "Reading Glasses" basket for our variety glasses.
This was super easy! Dollar Tree for the baskets, ribbon from Hobby Lobby, and my labels!
I LOVE them! I can't wait to use them this year!
Grab them here:


My second project was creating mini erasers to use next year with my class. I love the little erasers that fit in their hands! The ones in the store can add up! So I decided to make my own.
I used 5" sewn, felt erasers.
My dad made me a set a very long time ago and they have lasted great! When dad made them for me he used his electric saw and the cuts for each one were almost perfect. Mine are not perfect but I can take pride in the fact that I did it! The erasers were donated so all I had to do was cut them, print the labels (Thank you HP Instant Ink: post on that click here!) and then laminate them.
Total cost: 20 cents!
Here are the steps:
If you don't have time to make your own, you can always order them! I found these on Amazon and they are super cute! (affiliate links)
I had eye surgery last week so I took a few days off to heal but now I am back!
This post contains affiliate links. I earn a small commission each time someone makes a purchase using one of my links, which helps to support the blog. All opinions are my own.
See our full disclaimer here.

My first project on the list was making a couple of cute bins. My "Read Alouds" basket to hold some of the books we will read during the week & a "Reading Glasses" basket for our variety glasses.
This was super easy! Dollar Tree for the baskets, ribbon from Hobby Lobby, and my labels!
I LOVE them! I can't wait to use them this year!
Grab them here:


My second project was creating mini erasers to use next year with my class. I love the little erasers that fit in their hands! The ones in the store can add up! So I decided to make my own.
I used 5" sewn, felt erasers.
My dad made me a set a very long time ago and they have lasted great! When dad made them for me he used his electric saw and the cuts for each one were almost perfect. Mine are not perfect but I can take pride in the fact that I did it! The erasers were donated so all I had to do was cut them, print the labels (Thank you HP Instant Ink: post on that click here!) and then laminate them.
Total cost: 20 cents!
Here are the steps:
1. Collect your materials. I used a utility knife, a kitchen knife, scissors, and a cutting board.
2. Cut the hand-sewn, felt erasers in half using your utility knife.
3. Find the mid-point and cut the long pieces in half. I used the utility knife to get through the top and the kitchen knife to cut through the felt. Now you have four pieces.
4. Trim the felt to make them neat.
For the next steps watch my quick video!
Here are mine finished:
This set will stay at my small group table in their work baskets.
I made a numbered set so I would not have to update them each year. I am hoping they will last! On this set, I am going to try and attach magnets to the side and each child will get their own.
These will be strategically placed around the room in stations where they won't have their own numbered eraser.
I LOVE the way they turned out!If you don't have time to make your own, you can always order them! I found these on Amazon and they are super cute! (affiliate links)
We hope you are enjoying your summer!
Happy Crafting!


Your erasers look cute. Hope they hold up to the kids. Thanks for sharing the idea.
ReplyDeleteThank you so much Laura! I hope they hold up, too. Glad you stopped by!
Delete