Teachers Pay Teachers Facebook Bloglovin' Pinterest Twitter Instagram Image Map

July 15, 2017

Alphabet Wheels for Hands on Fun!

Hello Friends!
As you know we LOVE to make materials to use with our students that they can get their hands-on and have FUN!

Did you buy these clips from the Target Dollar Spot?
If you didn't, you can make your own!
Target Dollar Spot Alphabet Clips

We got some and we made these to match!
Target Dollar Spot Alphabet Clips, Alphabet Wheels

Students will learn and have fun matching the beginning sounds!
Target Dollar Spot Alphabet Clips, Alphabet Wheels
 They can also practice finding the missing letter!
Target Dollar Spot Alphabet Clips, Alphabet Wheels

 They can also practice matching beginning sound cards!
Target Dollar Spot Alphabet Clips, Beginning Sounds

As I began to think of all of the different clip stations I wanted with clothespins, I decided I needed to make clothespins to match! I searched for stickers, wooden letters, or foam shapes but I couldn't find any that would work.

So I developed these ...
Color, Shape, and Number Wheels, Planet Happy SmilesNumber Wheels, Planet Happy Smiles
I made strips to match each set!  I love them!
I used clothespins from Walmart. I printed, laminated, and then hot glued them to my clothespins.
Clothespin Activities, Planet Happy Smiles
Here is what they look like in action!
Here are the number sets:
Number Wheels, Planet Happy SmilesNumber Wheels, Planet Happy Smiles

Number Wheels, Planet Happy SmilesNumber Wheels, Planet Happy Smiles

Here are the color sets:
Color Wheels, Planet Happy Smiles

Color Wheels, Planet Happy Smiles

I also made a set with just pom-poms!
Color Wheels, Planet Happy Smiles

Here are the shape & counting sets:

Shape Wheels, Planet Happy SmilesShape Wheels, Planet Happy Smiles

Counting Wheel, Planet Happy Smiles

 I also made a complete set of uppercase and lowercase letters for anyone who could not find the alphabet clips.

Here are some storage ideas:
Alphabet Clips, Planet Happy Smiles
Pencil Box

Alphabet Clips Storage, Planet Happy SmilesAlphabet Clips Storage, Planet Happy Smiles
If you want to implement these hands-on stations in your classroom or with your own kids at home, you can grab it by clicking the picture below!
 Alphabet Adventures Clip Cards
We hope you LOVE this easy set of stations!
Happy Teaching!

July 6, 2017

GIVEAWAY! $75 to Teachers Pay Teachers

Hello Friends!
Who needs $75 to Teachers Pay Teachers?
I know I do!  My cart is packed!
Follow all of the steps to enter to win this AMAZING prize!
GIVEAWAY DETAILS:  

Prize: $75 Teachers Pay Teachers Gift Card

Giveaway Organized by: Kelly Malloy (An Apple for the Teacher)


Rules: Use the Rafflecopter to enter.  Giveaway ends 7/13/17 and is open worldwide.


Best of Luck!

July 5, 2017

Planet Happy Smiles: Monday Made It!

Hello Friends!
I am linking up with Tara from 4th Grade Frolics for Monday Made It!
I had eye surgery last week so I took a few days off to heal but now I am back!

This post contains affiliate links. I earn a small commission each time someone makes a purchase using one of my links, which helps to support the blog.  All opinions are my own. 
See our full disclaimer here.

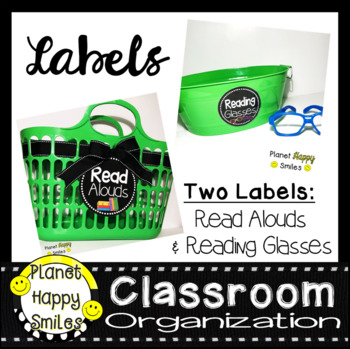
My first project on the list was making a couple of cute bins. My "Read Alouds" basket to hold some of the books we will read during the week & a "Reading Glasses" basket for our variety glasses.
Planet Happy Smiles, Read Alouds Basket

Planet Happy Smiles, Reading Glasses Basket

This was super easy!  Dollar Tree for the baskets, ribbon from Hobby Lobby, and my labels!
I LOVE them! I can't wait to use them this year!
Grab them here:
http://bit.ly/ReadAloudsLabel

My second project was creating mini erasers to use next year with my class.  I love the little erasers that fit in their hands! The ones in the store can add up! So I decided to make my own. 
I used 5" sewn, felt erasers.

My dad made me a set a very long time ago and they have lasted great! When dad made them for me he used his electric saw and the cuts for each one were almost perfect.  Mine are not perfect but I can take pride in the fact that I did it! The erasers were donated so all I had to do was cut them, print the labels (Thank you HP Instant Ink: post on that click here!) and then laminate them.
Total cost: 20 cents!
Planet Happy Smiles, Mini Erasers
Here are the steps:
1. Collect your materials.  I used a utility knife, a kitchen knife, scissors, and a cutting board.
2. Cut the hand-sewn, felt erasers in half using your utility knife.
3. Find the mid-point and cut the long pieces in half. I used the utility knife to get through the top and the kitchen knife to cut through the felt. Now you have four pieces.
4. Trim the felt to make them neat.

For the next steps watch my quick video!

Here are mine finished:
Planet Happy Smiles, Mini Erasers
This set will stay at my small group table in their work baskets.

Planet Happy Smiles, Mini Erasers
I made a numbered set so I would not have to update them each year.  I am hoping they will last! On this set, I am going to try and attach magnets to the side and each child will get their own.

Planet Happy Smiles, Mini Erasers
These will be strategically placed around the room in stations where they won't have their own numbered eraser.
I LOVE the way they turned out!

If you don't have time to make your own, you can always order them! I found these on Amazon and they are super cute! (affiliate links)
We hope you are enjoying your summer!
Happy Crafting!

LinkWithin

Related Posts Plugin for WordPress, Blogger...